Download TestDisk — Free Data Recovery Tool
Recover lost partitions, repair boot sectors, and undelete files from FAT, NTFS, and ext2 filesystems. Trusted by IT professionals worldwide.
What Is TestDisk?
A free, open-source data recovery utility built for fixing partition tables, recovering deleted partitions, and rebuilding damaged boot sectors.
Partition recovery without the price tag
TestDisk is a command-line data recovery tool developed by Christophe Grenier under the CGSecurity project. It handles a problem most users hope they never face: lost or corrupted partitions, broken boot sectors, and accidentally deleted files. The tool runs on Windows, macOS, Linux, FreeBSD, and even DOS — covering practically every system you might need to recover.
Unlike commercial recovery software that charges per recovered file, TestDisk is entirely free under the GPL v2 license. It ships alongside PhotoRec, a companion file carving tool that recovers individual files from damaged or formatted drives. Together, they cover both partition-level and file-level recovery.
How it works
TestDisk operates through a text-based console interface. You select a disk, choose the partition table type (MBR, GPT, Apple, or Sun), and the tool scans for lost or damaged partition structures. It can rebuild FAT12, FAT16, FAT32, NTFS, and ext2/ext3/ext4 boot sectors from their backups, and it can undelete files from FAT, exFAT, NTFS, and ext2 filesystems. The deep search mode digs sector-by-sector when a quick scan falls short.
IT professionals and system administrators have relied on TestDisk for over 15 years. It shows up consistently in forum recommendations and Reddit threads whenever someone asks about free partition recovery. The tool requires administrator or root privileges to access raw disk data, which is standard for any low-level disk utility.
What TestDisk can fix
- Lost partition recovery — Finds and restores partitions that went missing after a crash, accidental deletion, or virus attack
- Boot sector repair — Rebuilds FAT and NTFS boot sectors using backup copies stored on the drive itself
- File undelete — Recovers deleted files from FAT, exFAT, NTFS, and ext2 filesystems when the data has not been overwritten
- Partition table fix — Corrects damaged MBR and GPT partition tables so the operating system can see your drives again
Ready to recover your data? Download TestDisk or read the getting started guide for a step-by-step walkthrough.
Key Features
TestDisk packs serious data recovery power into a portable, open-source package. Here is what it can do for you.
Partition Table Recovery
TestDisk rebuilds damaged or corrupted partition tables across MBR, GPT, Apple Partition Map, and Sun disk label formats. If your drive suddenly shows as unallocated or a partition disappears after a crash, TestDisk can scan for lost partition boundaries and restore the original layout without formatting.
Deleted Partition Recovery
Accidentally deleted a partition? TestDisk performs deep scans across the entire disk surface to locate partition signatures that still exist on disk. It recovers both primary and logical partitions, even when the partition table has been zeroed out.
Boot Sector Repair
Fixes damaged or missing boot sectors on FAT12, FAT16, FAT32, NTFS, ext2, ext3, and ext4 filesystems. When Windows refuses to boot or Linux drops to a GRUB rescue prompt, TestDisk can reconstruct the boot sector from its backup copy.
File Undelete
Recovers individual deleted files from FAT, exFAT, NTFS, and ext2 filesystems. Browse deleted directories, preview recoverable files, and copy them to a safe location. Particularly useful when you need specific files back rather than an entire partition.
File Copy from Damaged Drives
Even when a partition is too damaged to mount normally, TestDisk can still read and copy files from it. This works on corrupted FAT and NTFS volumes where Windows says the drive needs formatting.
Deep Search Analysis
The deep search mode reads every sector of the disk to find partition boundaries that a quick scan might miss. It checks for backup headers, superblocks, and filesystem signatures buried on the drive surface.
Cross-Platform Support
Runs on Windows (Vista through 11), macOS (Intel and Apple Silicon), Linux, FreeBSD, NetBSD, OpenBSD, and even DOS. The same command-line interface works identically everywhere, so recovery procedures learned on one OS transfer directly to another. No installation required on most platforms — just extract and run.
Wide Filesystem Support
Handles FAT12, FAT16, FAT32, exFAT, NTFS, ext2/3/4, HFS, HFS+, JFS, XFS, ReiserFS, btrfs, and more. This covers nearly every disk format used on consumer and server hardware today.
Bundled with PhotoRec
Every TestDisk download includes PhotoRec, a companion file carving tool. PhotoRec recovers photos, videos, documents, and archives by scanning raw data blocks, making it effective even on reformatted or severely damaged drives.
RAID Recovery
TestDisk can work with software RAID configurations and recover partitions from multi-disk arrays. For system administrators dealing with failed RAID setups, this feature lets you access data that would otherwise require expensive professional recovery.
Free and Open Source
Licensed under GPL v2 with full source code available on GitHub. No trial limits, no premium tiers, no file-size caps. Every recovery feature is available to every user, always. The project has been actively maintained since 1998.
Ready to recover your data? Download TestDisk and get started in minutes.
System Requirements
TestDisk is lightweight and runs on almost any hardware. Here is what you need to get started with partition recovery.
| Component | Minimum | Recommended |
|---|---|---|
| Operating System | Windows Vista (32-bit or 64-bit) | Windows 10/11 (64-bit) |
| Processor (CPU) | Any x86 or x86_64 processor | Dual-core 1.0 GHz or faster |
| RAM | 256 MB | 1 GB or more |
| Disk Space | ~28 MB (portable, no install needed) | 50 MB free (including logs and temp files) |
| Display | 80×25 text terminal | Any modern display (TestDisk is text-based) |
| Privileges | Administrator (Windows) / root (Linux/macOS) | Same — raw disk access requires elevated rights |
| Internet | Not required (fully offline) | Optional for downloading updates |
TestDisk is portable software. Extract the zip archive and run the executable directly — no installation required. Includes PhotoRec for file-level recovery.
TestDisk in Action
TestDisk runs entirely in your terminal. Here is what the console interface looks like at each stage of the recovery process.

TestDisk uses a text-based console interface – no graphical window required.
Download TestDisk
Get the latest stable release of TestDisk for your operating system. All downloads include PhotoRec, the companion file recovery tool.
TestDisk & PhotoRec 7.2
TestDisk 7.2 ships as a portable ZIP archive. No installer required – just extract and run. Includes both TestDisk and PhotoRec in a single package.
Download TestDisk Windows 64-bit · ZIP · ~26 MBAll Platforms
TestDisk runs as a portable application. Extract the ZIP and run testdisk_win.exe as Administrator.
Need help? Check the Getting Started guide or view the system requirements.
Frequently Asked Questions
Answers to the most common questions about downloading, installing, and using TestDisk for data recovery and partition repair.
Is TestDisk safe to download and use?
Yes, TestDisk is safe. It has been developed by Christophe Grenier at CGSecurity since 1998 and is distributed under the GNU GPL v2 open-source license. The source code is publicly available on GitHub, which means anyone can audit it for security issues. TestDisk has been reviewed and recommended by major publications including TechRadar, Softpedia, and MakeUseOf.
The version 7.2 Windows 64-bit download weighs roughly 28 MB and comes as a ZIP archive with no installer – there is nothing hidden in a setup wizard. Antivirus scanners from VirusTotal consistently return clean results for official builds. The only real risk with TestDisk is misusing it: if you write incorrect partition data to a disk, you can make things worse. That said, TestDisk does not modify anything until you explicitly choose “Write” in the final step.
- Source code on GitHub at
cgsecurity/testdisk– fully auditable - No adware, no bundled toolbars, no telemetry
- Trusted by IT professionals and sysadmins for over 25 years
- Recommended on r/datarecovery as the go-to free partition recovery tool
Pro tip: Always download from the official CGSecurity website or from our download section. Third-party download sites sometimes repackage TestDisk with adware bundlers.
For more details on what TestDisk can do, see our features overview.
Is TestDisk free from malware and spyware?
TestDisk is completely free from malware and spyware. As an open-source project licensed under GPL v2, every line of code is visible on GitHub for public review. No binary obfuscation, no telemetry endpoints, no data collection of any kind.
When you download TestDisk 7.2 from the official CGSecurity site, the archive contains only the executable files, documentation, and required libraries. Running the official ZIP through VirusTotal shows 0 detections across all major antivirus engines. The project has no revenue model that would incentivize bundling – Christophe Grenier maintains it as a community-driven project, funded partly by donations.
- No installer executable – just extract the ZIP and run
testdisk_win.exe - No network connections made during operation – TestDisk works entirely offline
- No auto-update mechanism, no phone-home behavior
- If your antivirus flags it, that is a false positive caused by the low-level disk access routines
Pro tip: If Windows Defender or another antivirus blocks TestDisk, add an exclusion for the extracted folder. The disk-level read operations TestDisk performs sometimes trigger heuristic detections, but these are false alarms.
You can grab the verified download from our download page.
Where can I download the official version of TestDisk?
The official source for TestDisk is the CGSecurity website at cgsecurity.org, maintained by the developer Christophe Grenier. You can also download it directly from our download section, which links to the official builds.
TestDisk 7.2 (released February 22, 2024) is the latest stable version. The download is available for Windows (both 32-bit and 64-bit), macOS (Intel and Apple Silicon), Linux (static binaries), and several BSD variants. The Windows 64-bit ZIP is about 28 MB. All builds come bundled with PhotoRec, the companion file-carving tool.
- Windows 64-bit:
testdisk-7.2.win64.zip(~28 MB) - Windows 32-bit:
testdisk-7.2.win.zip(~25 MB) - macOS: Universal binary supporting Intel and M1/M2/M3 chips
- Linux: Static binary that works on most distributions without dependencies
A common mistake is downloading from third-party sites like Softonic or CNET, which may wrap the download in their own installer and bundle unwanted software. Stick to the official source or our verified links.
Pro tip: CGSecurity also provides MD5 and SHA-256 checksums for each release. After downloading, verify the checksum to make sure the file was not tampered with during transfer.
Head to our download section for direct links to all platforms.
Does TestDisk work on Windows 11?
Yes, TestDisk 7.2 works on Windows 11 without issues. It supports all Windows versions from Vista through Windows 11, including both 23H2 and 24H2 updates. The program runs as a standard console application and does not depend on any Windows-specific frameworks or .NET runtimes.
On Windows 11, you need to run TestDisk as Administrator to access physical disks. Right-click testdisk_win.exe and select “Run as administrator,” or open an elevated Command Prompt and launch it from there. Without admin privileges, TestDisk can only see logical drives and will miss physical disk information needed for partition recovery.
- Works on Windows 11 Home, Pro, and Enterprise editions
- Compatible with both UEFI/GPT and Legacy BIOS/MBR systems
- Supports Secure Boot-enabled machines – no need to disable it
- If Windows SmartScreen blocks it, click “More info” then “Run anyway”
Pro tip: On Windows 11, the default terminal is Windows Terminal. TestDisk works fine in it, but the classic Command Prompt (cmd.exe) renders the text-based interface more reliably. Launch cmd.exe as admin, then navigate to the TestDisk folder and run testdisk_win.exe from there.
Check our system requirements for the full compatibility list.
What are the minimum system requirements for TestDisk?
TestDisk has minimal system requirements because it is a lightweight console application with no graphical interface. Any computer manufactured in the last 15 years will run it without problems.
For the Windows 64-bit version, you need Windows Vista or later, a 64-bit processor (any x86-64 CPU from Intel or AMD), at least 512 MB of RAM, and roughly 30 MB of free disk space for the program files. In practice, the scan process itself does not require much memory – TestDisk reads disk sectors sequentially and keeps a relatively small amount of data in memory at any given time. The main bottleneck is disk I/O speed, not CPU or RAM.
- OS: Windows Vista/7/8/10/11 (64-bit), macOS 10.6+, Linux kernel 2.6.18+
- CPU: Any x86 or x86-64 processor
- RAM: 512 MB minimum (1 GB recommended for large disks)
- Disk: 30 MB free space for program files
- Privileges: Administrator/root access required for physical disk access
Pro tip: If you are recovering data from a failing drive, run TestDisk from a separate boot drive or USB to avoid writing to the damaged disk. The Linux live USB approach works particularly well for this.
See our system requirements table for the detailed breakdown.
Does TestDisk work on macOS and Linux?
Yes. TestDisk is a cross-platform tool that runs on macOS, Linux, FreeBSD, NetBSD, OpenBSD, SunOS, and even DOS. It is not a Windows-only utility.
On macOS, TestDisk 7.2 supports both Intel Macs and Apple Silicon (M1, M2, M3) through a universal binary. You can install it via Homebrew with brew install testdisk or download the macOS build from the official site. On Apple Silicon, it runs natively without Rosetta. You will need to run it with sudo in Terminal to access raw disk devices.
On Linux, TestDisk is available in the package repositories of most major distributions. Install it with sudo apt install testdisk on Ubuntu/Debian, sudo dnf install testdisk on Fedora, or sudo pacman -S testdisk on Arch Linux. Alternatively, download the static binary from CGSecurity, which works on any Linux distribution without dependencies.
- macOS: Homebrew or direct download, Intel + Apple Silicon
- Ubuntu/Debian:
sudo apt install testdisk - Fedora/RHEL:
sudo dnf install testdisk - Arch Linux:
sudo pacman -S testdisk - Any Linux: Static binary from CGSecurity, no dependencies needed
Pro tip: On Linux live USB environments (like Ubuntu Live), TestDisk is often pre-installed or easily installable. This is the recommended way to recover partitions from a system that will not boot.
Download the build for your platform from our download section.
Is TestDisk completely free to download and use?
Yes, TestDisk is 100% free. There is no paid version, no premium tier, no feature-locked edition, and no trial period. Every capability the tool offers is available at no cost to everyone.
TestDisk is released under the GNU General Public License version 2 (GPL v2), one of the most well-known open-source licenses. This means you can download it, use it for personal or commercial purposes, modify the source code, and redistribute it – all without paying anything. The developer, Christophe Grenier, has maintained this project since 1998 and has never charged for it.
There are no hidden charges. Some data recovery tools advertise as “free” but require payment to actually save recovered files. TestDisk does not do this. If it finds your lost partitions or deleted files, you can recover them right away without hitting a paywall. The companion tool PhotoRec, bundled with every TestDisk download, is also completely free.
- No subscription fees or one-time purchase price
- No recovery limits – recover unlimited data
- No registration or account creation required
- Commercial use is allowed under GPL v2
Pro tip: If you find TestDisk helpful, consider donating to the CGSecurity project. The donation link is on the official website. It helps fund ongoing development and server costs.
See all the capabilities included for free in our features section.
Is there a paid or premium version of TestDisk?
No. TestDisk does not have a paid or premium version. The tool you download is the complete product with all features unlocked. This makes it different from most data recovery software on the market, which typically offers a free scan but charges $50-100+ to actually recover your files.
Commercial alternatives like Disk Drill, EaseUS Data Recovery, and Stellar Data Recovery all follow the freemium model where recovery is locked behind a paywall. TestDisk takes a different approach: Christophe Grenier develops it as a community project, supported by donations and his work as a data recovery consultant. The trade-off is that TestDisk has a text-based interface rather than a polished GUI, but it matches or exceeds paid tools in actual recovery capability for partition-level issues.
If you need professional-grade data recovery and do not want to learn a command-line tool, you might consider paid alternatives. But for partition recovery, boot sector repair, and file undelete on FAT/NTFS/ext2 filesystems, TestDisk handles those tasks as well as any commercial tool.
Pro tip: Data recovery companies sometimes use TestDisk internally as part of their toolkit. The same software that professionals rely on is available to you at no charge.
Get started with the free download from our download page.
How do I download and install TestDisk on Windows?
TestDisk does not have a traditional installer. You download a ZIP archive, extract it to any folder, and run the executable directly. The whole process takes about two minutes.
Here is exactly how to set it up on Windows 10 or 11:
- Download
testdisk-7.2.win64.zip(~28 MB) from our download section - Right-click the downloaded ZIP file and select “Extract All” (or use 7-Zip/WinRAR)
- Open the extracted
testdisk-7.2folder - Right-click
testdisk_win.exeand select “Run as administrator” - TestDisk opens in a terminal window showing the log file creation prompt
- Select “Create” to generate a log file (recommended) and press Enter
That is it. No installer wizard, no license agreement dialogs, no checkboxes to untick. You will not find TestDisk in your Start menu or Programs list because there is nothing to install. If you want easy access, create a desktop shortcut to testdisk_win.exe.
A common mistake: trying to run TestDisk by double-clicking without admin rights. The program will open but show no disks or only partial disk information. You must run as Administrator.
Pro tip: Extract TestDisk to a folder like C:ToolsTestDisk rather than leaving it in your Downloads folder. If you are recovering data from your main drive, put TestDisk on a USB drive instead to avoid overwriting the data you want to recover.
For a detailed walkthrough, check our Getting Started guide.
Is TestDisk portable or does it need installation?
TestDisk is inherently portable. There is no installer at all. You get a ZIP file, extract it, and run the executable from wherever you placed it. It writes no registry entries, creates no AppData folders, and leaves no traces on the system beyond the testdisk.log file in its own directory.
This portability is actually a major advantage for data recovery work. You can put TestDisk on a USB flash drive and carry it between machines without needing to install anything. This also means you can run TestDisk from a USB drive when recovering data from a computer’s internal drive, which prevents accidental overwrites of the data you are trying to recover.
- No installation, no setup wizard, no registry modifications
- Runs directly from USB drives, external hard drives, or network shares
- Works from Windows PE rescue environments
- The only file it creates is
testdisk.login its own directory
The ZIP archive contains both TestDisk and PhotoRec executables, along with some DLL files they need. Keep all files in the same folder – if you move only the EXE without the DLLs, it will not start and you will get a “missing DLL” error.
Pro tip: Keep a copy of TestDisk on a USB drive in your desk drawer. When a drive failure happens, you will not have time to download and set up recovery tools – having them ready saves precious time.
Grab the portable ZIP from our download section.
TestDisk does not find any partitions – what should I do?
If TestDisk’s Quick Search finds no partitions, that does not mean your data is gone. It means the Quick Search did not find partition signatures in the expected locations. There are several things to try before giving up.
First, make sure you selected the correct partition table type. TestDisk asks whether your disk uses Intel/PC (MBR), EFI GPT, Apple, or other formats. Most modern Windows PCs use EFI GPT, while older systems use Intel/PC. Selecting the wrong type will cause TestDisk to look for partition markers in the wrong format, finding nothing. If you are not sure, let TestDisk auto-detect – it usually gets this right.
- Run “Deeper Search” after Quick Search completes – this scans every sector and takes longer but finds partitions that Quick Search misses
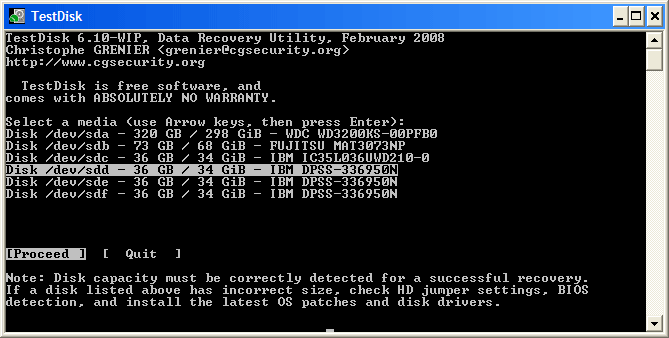
- Verify you selected the right disk – check the disk size matches what you expect
- Check the disk connection – USB adapters sometimes report incorrect disk geometry. Try connecting via SATA directly if possible
- Look for read errors in the TestDisk output – if you see many read errors, the disk may have hardware problems. Clone it with ddrescue first
- Try a different partition table type if auto-detection failed
On Reddit’s r/datarecovery, the most common cause of “no partitions found” is selecting Intel/PC on a GPT disk, or vice versa. The second most common cause is a physically failing drive with bad sectors that prevent reading the partition headers.
Pro tip: If the drive has bad sectors, do not keep running TestDisk on it. Each failed read attempt can degrade the drive further. Clone it to a healthy drive using ddrescue first, then run TestDisk on the clone.
See our Getting Started guide for a step-by-step recovery walkthrough.
Why is TestDisk analysis very slow or stuck?
A slow TestDisk scan usually means the disk has bad sectors or the drive is physically failing. When TestDisk encounters unreadable sectors, it waits for the disk’s firmware to time out before moving on. Each bad sector can add 5-30 seconds of delay, and a failing drive may have thousands of them.
For a healthy 1 TB hard drive, a Quick Search typically takes 5-15 minutes. A Deeper Search on the same drive takes 1-3 hours. If your scan has been running for many hours on a smaller drive, that points to hardware problems rather than a software issue.
- Check the TestDisk log file (
testdisk.log) for read error messages – many errors confirm a failing drive - Listen for clicking or grinding noises from the drive – these indicate mechanical failure
- SSDs do not make noise when failing but can become extremely slow on reads
- The “Rebuild BS” (boot sector) step getting stuck at a low percentage is a known symptom of bad sectors in the boot area
If the drive is failing, stop the scan immediately. Continuing to read a failing drive can cause it to die completely. Clone the drive first using ddrescue (which handles bad sectors gracefully) and then run TestDisk on the clone. This approach is universally recommended by data recovery professionals on forums like r/datarecovery.
Pro tip: You can check the drive’s SMART data using CrystalDiskInfo (Windows) or smartctl (Linux) before starting TestDisk. If SMART shows reallocated sectors, pending sectors, or CRC errors, clone the drive before attempting any recovery.
Review our features overview for details on what TestDisk can handle.
TestDisk recovered files but they will not open – what went wrong?
If TestDisk recovered files that appear corrupted or will not open, you likely used the file-copy feature instead of partition recovery. These are two different operations and the distinction matters a lot.
TestDisk’s primary job is restoring lost partitions by rewriting the partition table. When it works, you get your entire drive back exactly as it was – all files, all folders, all permissions intact. The file-copy feature (pressing ‘c’ to copy files from a detected partition) is a secondary function meant for grabbing individual files before committing to a partition write. Copied files sometimes come out as compressed .gz archives or with corrupted headers if the filesystem metadata is damaged.
- If you used “Write” to restore the partition table and rebooted, but the drive still shows as RAW, the boot sector may need repair too. Go back to TestDisk and use the “Advanced” menu to rebuild the boot sector
- If you copied files individually and they are corrupted, try recovering the partition instead – this preserves file structure and metadata
- If recovered files have the wrong extension or appear as .gz files, they were not actually recovered correctly. Use PhotoRec for file-level carving instead
- Always verify recovered files by listing them with ‘p’ in TestDisk before writing changes
A frequent Reddit thread pattern: users copy individual files instead of restoring the partition, get corrupted results, and think TestDisk failed. The solution in most cases is to go back and do a proper partition recovery with “Write” instead.
Pro tip: If partition recovery is not an option and you need file-level recovery, switch to PhotoRec (included with TestDisk). PhotoRec carves files by their signatures and is much better at recovering individual files from damaged drives.
Learn the correct recovery process in our Getting Started guide.
How do I update TestDisk to the latest version?
TestDisk does not have an auto-update feature. To update, download the latest version and replace your existing files. The current stable release is version 7.2, released on February 22, 2024.
Since TestDisk is portable (no installation), updating is straightforward: download the new ZIP, extract it to a new folder, and start using it. You can delete the old version’s folder afterward. There are no settings to migrate, no profiles to transfer, and no configuration files to preserve – TestDisk does not store any persistent settings.
- Visit our download section and grab the latest build for your OS
- Extract the new ZIP to a fresh folder (do not extract over the old one)
- Optionally delete the old TestDisk folder
- You can safely delete old
testdisk.logfiles – they are just scan logs
TestDisk releases are infrequent. Version 7.1 was released in July 2019, and version 7.2 came in February 2024. That is roughly a 4-5 year gap. Grenier tends to release when there is a meaningful set of improvements rather than on a fixed schedule. Between major releases, development snapshots are sometimes available on the CGSecurity website for users who want the latest fixes.
On Linux, if you installed via your package manager, run sudo apt update && sudo apt upgrade testdisk (Debian/Ubuntu) to get the latest version your distribution provides. Note that distro packages may lag behind the official release.
Pro tip: You do not need the newest version for most recovery work. Version 7.1 and 7.2 handle the same partition types. Update mainly for bug fixes and improved hardware support.
See what is new in TestDisk 7.2 in our features section.
What changed in the latest version of TestDisk?
TestDisk 7.2, released February 22, 2024, brought several improvements over the previous 7.1 release from July 2019. The update focused on better hardware compatibility, filesystem support improvements, and bug fixes rather than major new features.
Key changes in version 7.2 include improved exFAT filesystem support, better handling of large disks (over 2 TB), updated GPT partition table parsing, and fixes for certain edge cases where partitions were detected but not correctly aligned. The bundled PhotoRec also received updates with additional file signatures for newer file formats.
- Improved exFAT filesystem recovery and file undelete
- Better GPT partition handling on UEFI systems
- Updated Apple partition map support for recent macOS volumes
- Bug fixes for large sector size drives (4Kn)
- PhotoRec gains support for additional file signatures
- Compatibility improvements for Windows 11 and recent Linux kernels
If you are running TestDisk 7.1 and it works for your situation, there is no urgent reason to update. The core partition recovery engine has been stable for years. The 7.2 release matters most if you are working with exFAT volumes (common on SD cards and USB drives formatted for cross-platform use) or GPT disks on modern UEFI systems.
Pro tip: You can check your current version by launching TestDisk – the version number appears on the first screen along with the developer credit.
Download the latest version from our download page.
TestDisk vs Recuva – which is better for data recovery?
TestDisk and Recuva solve different problems. TestDisk recovers lost partitions and repairs boot sectors. Recuva recovers individual deleted files from working drives. They are complementary tools, not direct replacements for each other.
Recuva (by Piriform/CCleaner) offers a graphical wizard that is easy for beginners. It scans NTFS and FAT drives for recently deleted files and shows a traffic-light rating of recovery probability. However, independent testing by Pandora Recovery found that Recuva recovered only about 31% of test files successfully, with 69% of recovered files being corrupted. It also works only on Windows and cannot recover lost partitions at all.
TestDisk, on the other hand, does not have a GUI and requires some technical knowledge. But in partition-level recovery testing, TestDisk consistently outperforms Recuva. TechRadar gave the TestDisk/PhotoRec combination top marks for passing all their recovery tests. Where TestDisk struggles is in recovering individual files from a working, non-damaged filesystem – that is where Recuva is more appropriate.
- Use TestDisk when: a partition disappeared, the drive shows as “unallocated” or “RAW,” or the computer will not boot due to a corrupted boot sector
- Use Recuva when: you emptied the Recycle Bin and want to get a specific file back from a healthy NTFS drive
- Use PhotoRec when: the drive is severely damaged, formatted, or you need to recover photos/videos from a corrupted SD card
Pro tip: Since TestDisk bundles PhotoRec for free, you effectively get both partition recovery and file-level carving in one download. Recuva fills a narrow gap for quick “undelete” on Windows, but TestDisk plus PhotoRec covers more ground.
See our features breakdown for everything TestDisk can do.
What is the difference between TestDisk and PhotoRec?
TestDisk and PhotoRec are separate tools by the same developer, bundled together in one download. They handle different types of data recovery and are designed to be used in different situations.
TestDisk works at the partition level. It reads disk structures – partition tables, boot sectors, filesystem superblocks – and repairs or restores them. When successful, your entire drive reappears with all files in their original folders, with original filenames and directory structure intact. TestDisk can also undelete files from FAT, exFAT, NTFS, and ext2 filesystems when the filesystem itself is still functional.
PhotoRec works at the file level using signature-based carving. It ignores the filesystem entirely and scans raw disk sectors for known file headers (JPEG, PNG, DOCX, MP4, and over 480 other formats). This means PhotoRec works even when the filesystem is completely destroyed, but recovered files lose their original names and folder structure. They get generic names like f0012345.jpg.
- TestDisk: Fixes partition tables and boot sectors. Restores files with names and folders intact. Needs at least partial filesystem structure
- PhotoRec: Carves files from raw disk data. Works on completely destroyed filesystems. Loses file names and folders. Supports 480+ file types
The typical workflow: try TestDisk first to restore the partition. If that fails because the filesystem is too damaged, switch to PhotoRec to salvage individual files.
Pro tip: When using PhotoRec, always recover files to a different drive than the one you are scanning. Recovering to the same drive will overwrite the very data you are trying to salvage.
Both tools are included in our download package.
Can TestDisk recover data from an SSD?
TestDisk can recover lost partitions from SSDs, but recovering individual deleted files from an SSD is usually not possible. This is because of TRIM, a command that modern operating systems send to SSDs to permanently erase data blocks that are no longer in use.
When you delete a file on an HDD, the data remains on the disk until it gets overwritten by new data. On an SSD with TRIM enabled (which is the default on Windows 7 and later), the operating system tells the SSD to wipe those blocks immediately. Once TRIMmed, the data is gone at the hardware level. No software tool – TestDisk, PhotoRec, or any commercial tool – can recover TRIMmed data.
That said, TestDisk still works well for SSD partition recovery in these scenarios:
- The partition table was corrupted or accidentally deleted – TestDisk can rebuild it
- The boot sector is damaged – TestDisk can repair it using the backup boot sector
- The SSD is in a USB enclosure – TRIM may not be passed through USB, so deleted files might still exist
- TRIM was disabled in the operating system (rare but possible)
- The deletion just happened and TRIM has not yet processed all blocks
This is a common frustration point on Reddit. Users try TestDisk on their SSD, expecting it to work like it does on HDDs, and find no recoverable files. For SSDs, act fast and consider disabling TRIM temporarily if you know you need to recover recently deleted data.
Pro tip: If you accidentally formatted an SSD, immediately power it off and remove it from the system. The longer the SSD stays powered on with TRIM active, the more data gets permanently erased. Connect it as a secondary drive to a different computer and disable TRIM before attempting recovery.
Read about TestDisk’s full capabilities in our features section.
How do I recover a deleted partition with TestDisk step by step?
Recovering a deleted partition is TestDisk’s primary use case, and the process takes about 10-20 minutes on a healthy drive. Here is the exact sequence of steps.
- Extract TestDisk and run
testdisk_win.exeas Administrator - Select “Create” to generate a log file, then press Enter
- Select the disk that had the deleted partition (check the size to confirm you picked the right one)
- Choose the partition table type – select “EFI GPT” for modern UEFI systems or “Intel” for older MBR/BIOS systems. TestDisk usually detects this correctly
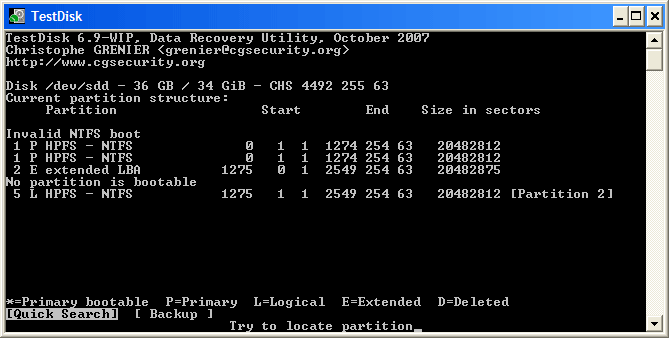
- Select “Analyse” and press Enter. TestDisk performs a Quick Search first
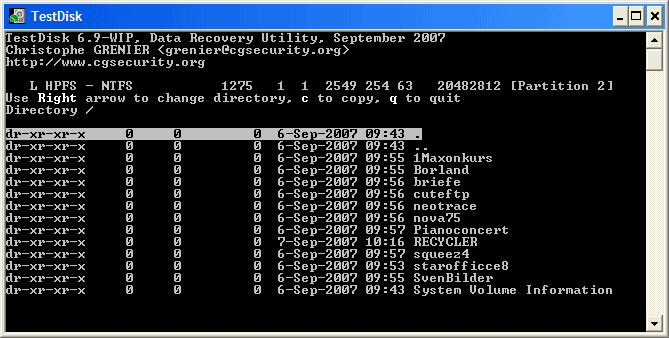
- If the deleted partition appears in green, press ‘p’ to list its files and verify the content
- If Quick Search does not find it, select “Deeper Search” to scan every sector
- Once you see your partition, use the arrow keys to set it as P (Primary) or L (Logical). Make sure it is not marked as D (Deleted)
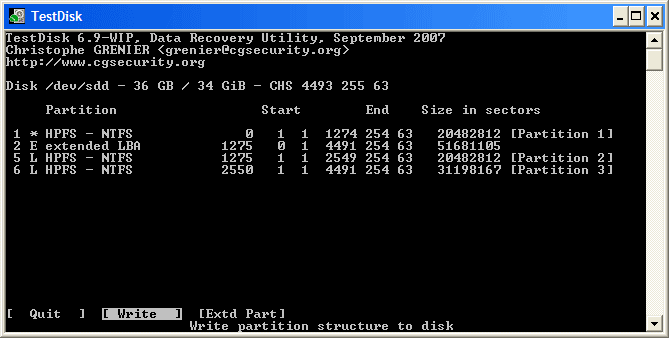
- Select “Write” to save the recovered partition table to disk
- Confirm the write operation and reboot your computer
After rebooting, the partition should appear in File Explorer with all its data intact. If the partition shows up but is listed as RAW, go back to TestDisk and use Advanced > Boot to repair the boot sector using the backup copy.
Do not skip step 6. Listing files before writing is your safety check. If the file listing looks wrong or empty, do not write – you may have selected the wrong partition boundaries.
Pro tip: Before writing, take a screenshot of the partition layout TestDisk shows you. If something goes wrong after the write, you will have a reference to compare against when troubleshooting.
Follow our complete Getting Started guide for detailed screenshots and explanations of each step.
Does TestDisk work offline without an internet connection?
Yes, TestDisk works completely offline. It does not require any internet connection to download data, verify licenses, or phone home to a server. Once you have the program files extracted, everything runs locally on your machine.
This is by design. Data recovery situations often involve computers that cannot boot into their operating system, machines in secure environments without network access, or drives pulled from dead systems and connected to a separate workstation. An internet requirement would make the tool useless in many of its most common use cases.
- No license activation or online verification needed
- No cloud-based scanning – all processing happens on your local CPU
- No download of virus definitions or signature updates
- Works from USB drives in recovery environments without networking
- The log file (
testdisk.log) is stored locally, never uploaded
For disaster recovery scenarios, keep a bootable Linux USB (like Ubuntu Live) with TestDisk pre-installed. You can boot from the USB, connect the problematic drive, and run TestDisk without any network access at all. This is the standard approach used by IT professionals in the field.
Pro tip: Prepare your recovery USB before you need it. During a data emergency is the worst time to be downloading tools and setting up boot drives.
Download TestDisk now and keep a copy ready from our download section.
Still have questions? Check our Getting Started guide or visit the official CGSecurity forum for community support.